
How To Install and Secure a Floating Granite Countertop
When installing countertops, especially on a kitchen island, you want to make sure they’re immovable. They are heavy and though it would be difficult to move a slab off of the island completely, instability could cause it to fall or become uneven. Something that heavy could cause irreversible damage to a person or surrounding area. Thus, it’s important to understand how to install and secure a floating granite countertop.
Preparation
In preparing for the installation of a countertop, you’ll want to clear the area as much as possible. Start by clearing your existing countertops; obviously the old ones are going to go and need to be accessible. Additionally, empty any cabinets in the area. You want to ensure that there’s ample space to work without running into items. Moreover, construction work can get messy, so the less stuff cluttering the area, the better.
Location
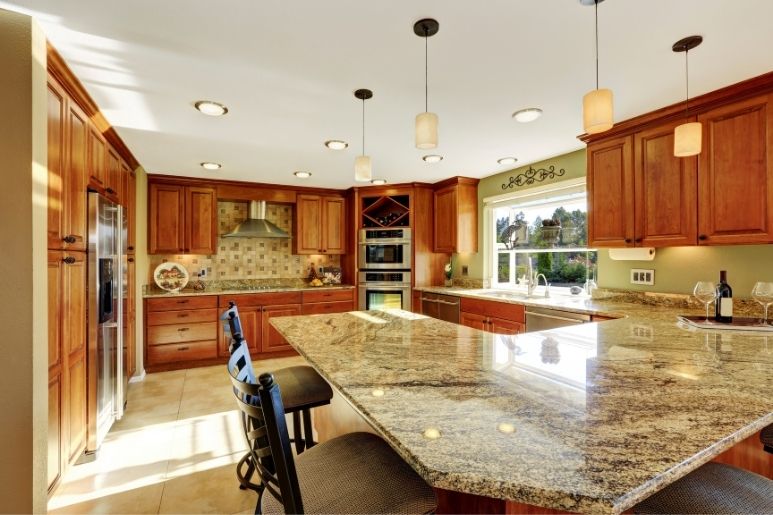
Floating granite countertops can be installed in two different places. They could either be up against walls on one or more sides, or they could be put on top of an island. Knowing where you want this type of counter is essential in determining how you want to secure it and how much overhang you desire. Many people would automatically assume that these types of counters would be going in a kitchen, but they could also be installed in bathrooms, rec rooms, and laundry rooms.
Overhang
When determining how much overhang you want, you need to note the granite’s thickness and top width. Without support, you have to be careful as to how much overhang you allow. With the proper support, your options are more flexible.
It’s recommended that if a countertop has a thickness of one and a quarter inches, it can hang eight to 10 inches over. However, without the proper support, anything past six inches is hazardous. If you plan to have people sit at the island countertop, you’ll want the overhang to be at least ten inches and you should install support measures to ensure this is possible. Regardless of the thickness, it’s best to err on the side of caution and add supports to ensure stability and levelness.
Underlayment
Some people use an underlayment when installing heavy countertops. An underlayment is plywood that lends support and stability. Many wonder if it’s even necessary to have an underlayment, as it can unnecessarily complicate an installation.
For thinner pieces of granite, the plywood absorbs pressure to prevent cracks and contribute to longevity. It should only be used if the granite is a three-quarter inch thick. Underlayment can be installed in many ways to be undetectable. You would only see it if you’re lying under the countertop. Or, it can be disguised using smaller pieces of granite to secure the perimeter.
Granite Thickness
For best results, opt for the three-centimeter or inch-and-a-quarter granite. Also known as full thickness granite, this option is often the only one contractors or installers offer. The two-centimeter version is more susceptible to cracking and breaking which would result in a premature fixing or replacing of countertop materials. It also requires additional support in an effort to prevent these issues. In this case, you may think you’re spending less up front, but you’ll pay for it in the long run by having to address these issues.
DIY
Do it yourself projects are fun, cost effective, and there’s no doubt that they’re incredibly educating. When determining if a granite countertop installation is something you should do yourself, consider a few things. Rate your level of skill with tools, installations, finding studs, and taking measurements.
If you’re not completely confident, it’s worth having a professional assist you. You don’t want any hiccups later on, so ensuring your very heavy countertop is there to stay and is properly leveled, supported, and measured, is worth it.
Securing
As you now know, securing is the most important part of the installation of a floating granite countertop. It will need both brackets and adhesive to be secure. In mounting a countertop into an area where it will back up to a wall, it’s best to anchor brackets by attaching to wall studs. You can first attach horizontal wall cleats to the wall studs for countertop support. If wall studs aren’t available, use drywall anchors.
For an island, they’ll have to be secured to the cabinetry. Granite countertops cannot be bolted or screwed into, so the brackets will be attached to the granite with a silicone caulking. Using Right On Bracket’s hidden countertop brackets, you can support the countertop you want without worrying about its weight. These reliable brackets are intended for heavy applications and stay out of the way to provide leg room beneath the counter.
Brackets
With a perfect ninety-degree angle, these brackets are available in a variety of lengths depending on the project. They range from seven to 24 inches, with 11 options in total. Once you’ve determined which thickness you need, you’ll want to install a bracket every 24 inches, maximum.
It’s best to divide the island up with marks for these distances before beginning. If the spacing isn’t even or not working, move the brackets either direction or closer together. The silicone caulking attaching the brackets to the underside of the countertop paired with the weight of it will secure them and ensure they are unable to move.
When determining how to install and secure a floating granite countertop, support and accuracy are both key. Understanding the product you’re using and the best ways to install and secure will give you the best results. There are many options for countertops, as you know. Choosing a beautiful granite countertop that floats to maximize accessibility will contribute greatly to your home. Be sure to take care and favor quality for the longest last possible.

How To Style and Organize Open Shelving in the Kitchen
Tips for Eliminating Household Clutter Once and for All
Related Posts

Space-Saving Shelf Ideas for Tiny Kitchens

Quick Guide to Building and Installing a Built-In Workbench

Ways to Use Shelf Brackets as Room Dividers

What To Consider Before Installing Shelves in Outdoor Spaces

Ensuring Your Bracket Installs Meet Building Codes

Tips for Properly Caring for Granite Countertops

Mistakes To Avoid When Installing Corner Shelves
